Modify Vertical Line Properties
Brief
The article explains how to modify properties of a vertical line.
Details
To modify properties of a vertical line
- Do one of the following:
- Double-click the vertical line.
- Right-click the vertical line, and then click Change Vertical Line 'Name',
where 'Name' stands for the name of the vertical line.
- See Change Properties/Remove Chart Elements.
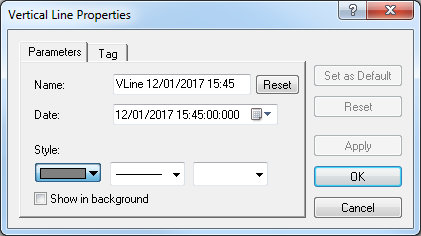
- The Vertical Line Properties dialog box appears.

- On the Parameters tab, change the line parameters:
- In the Name box, type a new name of your choice.
Note: To restore the default line name, click Reset.
- In the Date box, select or type a value of your choice. Note that you can enter the time value only by typing it, whereas the date value can be both
typed or selected from the calendar.
- In the appropriate Style boxes, click the color, style, and width
of your choice.
- To show the line in background, select the Show in background check box.
Otherwise, clear the check box.
Notes:
- To apply by default the selected properties (except for Name) to all vertical lines to be added in the future, click Set as Default.
- To restore the factory settings, click Reset.
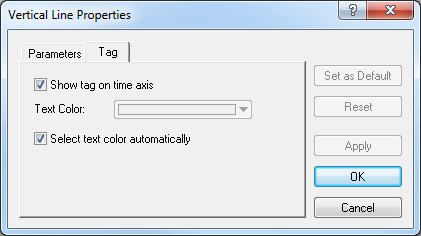
- To specify the line's Tag parameters, click the Tag tab. The dialog box opens on the Tag tab.

- To show a tag indicating the line's date and time on the time axis, select the Show tag on time axis check box. Otherwise, clear the check box.
- In the Text Color box, click the [Arrow button to select the color of the tag's text from the color palette. Note that the command is available
only when the Select text color automatically check box is not selected.
- To select the color of the tag's text automatically, select the Select text
color automatically check box. Otherwise, clear the check box.
Notes:
- To apply by default the selected properties to all vertical lines to be added in the future, click Set as Default.
- To restore the factory settings, click Reset.
- Click OK.
back

