Open Position
Brief
This section describes all possible ways of opening a position.
Details
To open a position from a chart
- Do one of the following:
- Click the tag of the current market price.
- Right-click in the chart or in the price values, and then click Create Market
Order.
- On the Trading menu, click Create Market Order.
- Press CTRL + SHIFT + M.
* In the E*TRADE FX platform, the command is available on the Charts menu, on
the Trading submenu.
- The Create Market Order dialog box will appear.
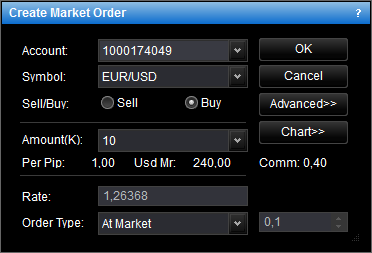
To view a five minute mini chart for the symbol shown in the Symbol box, click
Chart.
On the mini chart, you will see a line on the level of the current market price for the
trading operation selected in the dialog box.
- In the Account box, select the account if necessary.
- To choose the trade operation, click Sell or Buy.
- In the Amount (K) box, select or type the amount.
The the cost of one pip price movement and used margin for the specified amount are
shown in Per Pip and Usd Mr respectively.
The total amount of the commission to be charged for opening and closing the position is shown in Comm.
- In the Order Type box, select the order type, and then select
or type the range in the appropriate box if necessary.
On the mini chart, if the range is greater than zero, you will also
see two lines indicating the current range. You can change the range
by dragging either of these two lines to the necessary level.
You can also set the range by holding CTRL and dragging the order
line to the necessary level.
- To change the order Time In Force, click Advanced and then choose the necessary
Time-In-Force option.
- To add a stop and/or limit order, click Advanced, and then
specify your stop or limit prices by selecting the appropriate check
boxes and specifying the rate directly or in pips. You can also make
your stop order trailing by specifying the trailing step.
On the mini chart, lines on the price levels of these orders will
appear. You can change their prices by dragging the lines to the
necessary levels.
- Click OK.
The position will be displayed on the chart in one of the two ways:
- If the price at which the position has been opened is currently
visible on the chart, the position is displayed as a line with a
label. The label indicates the trade operation (Long or Short), the
date and time when the position was opened and the current position
profit/loss in pips.
Note: Time is shown only for positions which were opened
during the last 12 hours. The date and time is also indicated on
the line by the opening mark.
- If the price at which the position has been opened is currently not
visible on the chart, the position is displayed as a marker.
Notes:
- If the price is higher than prices displayed on the chart, a position marker appears
at the top border of the chart.
- If the price is lower than prices displayed on the chart, a position marker appears
at the bottom border of the chart.
- If you wish to see the price at which the position was opened, click the position
marker.
When you point to a line, label or marker of a position, a tooltip
indicating the trade operation (Short or Long), the open price, the date
when the position was opened, and the current profit/loss in pips is
displayed.
In case you created stop/limit orders together with the position, the orders
will be displayed on the chart if their prices are currently visible. Each
such order is displayed as a line with a label. The label indicates the
order type and the time when the order was created. The labels of both
orders have the same color and they both are highlighted when you point to
one of them. The date and time when the order was created is also indicated
on the line by the creation mark.
If the price of the order is currently not visible, the order line with the
label is not visible on the chart.
New Open Position Markers
Now you can also view an open position as a marker in the form of an arrow.
Buying is indicated by an upward arrow under the position line, selling is
indicated by a downward arrow above the position line. The marker also
indicates whether the position is profitable or loss-making by color, green
or red respectively. When you point to the marker, it is highlighted, and a
tooltip is displayed. Also a position marker is highlighted when you point
to the position line or label, and vice versa.
When more than one position is opened in one period, instead of a number of
markers, a larger marker is shown to indicate all operations of one kind for
the period (buy operations are shown by a larger upward arrow, sell
operations are shown by a larger downward arrow).
Note: When both trading history and open
position markers are shown on the chart and positions were both closed and
opened in some period, instead of a number of markers, a larger marker is
shown to indicate all operations of one kind for the period (buy operations
are shown by a larger upward arrow, sell operations are shown by a larger
downward arrow). In this case a profit/loss label shows only profit/loss of
closed positions. When you point to the marker, you see a tooltip with
average open and/or close prices and profit/loss of positions opened and
closed in the period.
To show/hide the markers on a chart:
- Do one of the following:
- On the File menu, click Options.
- Right-click in the vertical or horizontal scale, and then click Options.
- Right-click in the chart and then click Options.
* In the E*TRADE FX platform, the command is available on the System menu.
- The Options dialog box will appear.
- Click Open Position Options.
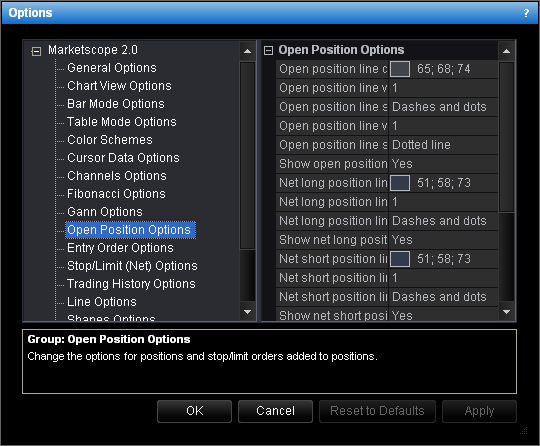
- To show position markers by default, click Show markers, and then set the option
to Yes. Otherwise, set the option to No.
- Click OK.
back