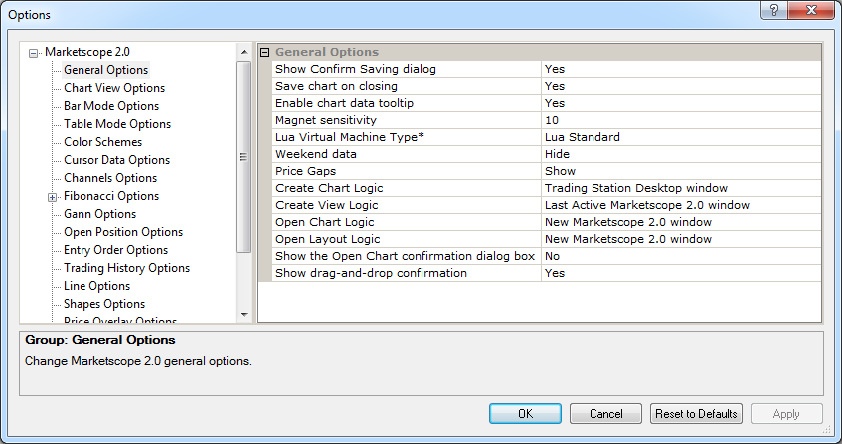
- On the File menu, click Options.
- Right-click anywhere in the chart, and then in the menu that appears, click Options.
* In the FXCM Trading Station, the command is available on the System menu.

General Options
Brief
The article explains how to customize the chart general options.
Details
You can customize a chart's general options: select whether to show or not various confirmation dialog boxed in the process of working with different chart elements, show or hide various price data (weekend data, for example) or price gaps, customize the logic and settings of certain procedures. To customize the options

Template Options
Option |
Description |
Show Confirm Saving dialog |
The option allows showing or hiding the dialog box asking whether to save or not the template changes when it is being closed (if no changes have been made, the dialog box does not appear): click
in the option row, click the arrow |
Save chart on closing |
The option allows saving or not template changes when it is being closed: click in the option row, click the arrow |
Chart Location Options
Option |
Description |
Create Chart Logic |
The option allows selecting the location of a newly-created chart: click in the option row, click the arrow |
Create View Logic |
The option allows selecting the location of a newly-created view: click in the option row, click the arrow |
Open Chart Logic |
The option allows selecting the location of a chart created with the Open Chart command: click in the option row, click the arrow |
Open Layout Logic |
The option allows selecting the location of a layout: click in the option row, click the arrow |
Show the Open Chart confirmation dialog box |
The option allows showing or hiding the Open Chart confirmation dialog box: click in the option row, click the arrow
|
Other Options
Option |
Description |
Enable chart data tooltip |
The option allows showing or hiding a data tooltip: click in the option row, click the arrow |
Magnet sensitivity |
The option allows selecting the magnet sensitivity level in pixels when using the Snap to Nearest drawing mode: click in the option row, highlight or delete the original value, and then type a value of your choice. The available values are from 0 through 1000. Selecting 0 disables the option. |
Lua Virtual Machine Type* |
The option allows selecting the Lua virtual machine type: click in the option row, click the arrow |
The option allows either showing or hiding the weekend market data on the chart or merging it into the Monday prices: click in the option row, click
the arrow |
|
The option allows showing or hiding price gaps: click in the option row, click
the arrow |
|
Show drag-and-drop confirmation |
The option allows showing or hiding a confirmation dialog box when dragging charts windows between Marketscope and the FXCM Trading Station: click in the option row, click the arrow
|
To enable the modified values, click OK at the bottom of the dialog box.